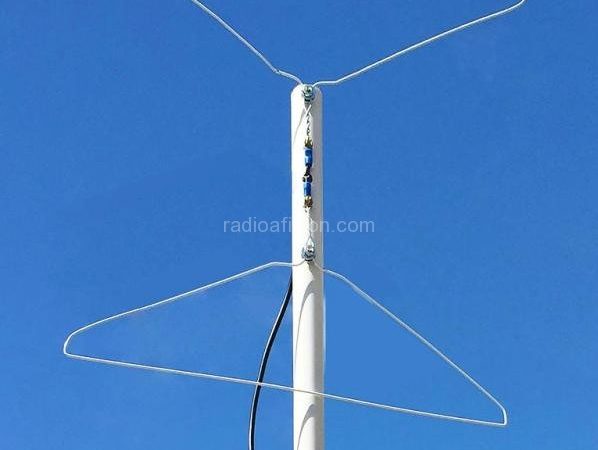
 2 meter vertical antenna built with coat hangers
An Ultra-Simple 2-Meter Antenna
You’ll get J-pole performance from this base station vertical antenna built with coat hangers and PVC pipe.
Amateur Radio operators have distinguished themselves by their ability to build equipment from junk and bits and pieces found around the house. No one embodies the homebrewing spirit more than my ham buddy,
Ernie, W6DN; who sees a scrap box full of snips of wire. PVC pipe pieces, and fittings as something not to be tossed out. but as materials for a new antenna project.
Recently, Ernie and I. along with several other longtime hams. were ruminating about what constituted the archetypal homebrew project — it had to be functional. easy to make. and cost nearly nothing. Many good ideas were proposed. but the winner was a 2-meter base station vertical antenna made from a pair of coat hangers. a length of PVC pipe. four 8-32 screws. two ring terminals. and. of course. some RG-58 coax.
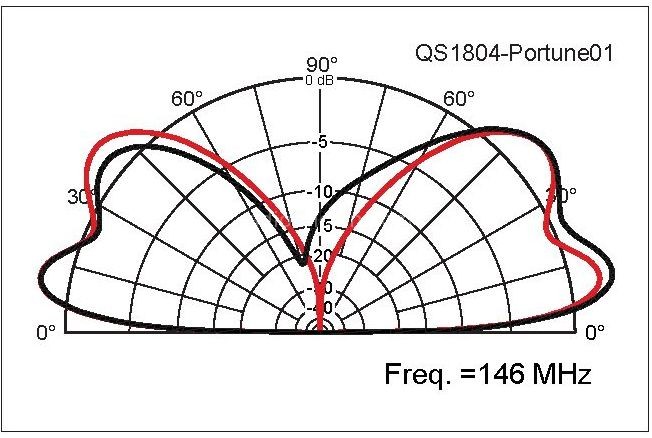
Figure 1 — Performance of the coat hanger vertical (red) compared to a J-pole (black) 5 feet above average soil.
Performance
This little beauty can hold its own alongside anybody’s J-pole (see Figure 1). Both are omnidirectional. vertically polarized. and have the same gain. Physically, the coat hanger construction. at a length of 16 inches. compared to the J-pole’s 57 inches — is less likely to be noticed by the neighbors.
The antenna has an SWR of roughly 1.8:1 at resonance (see Figure 2). However. the SWR stays close to 2:1 across the entire 2-meter band. Modern 2-meter rigs can handle this easily. and the losses are quite small at an
SWR of 2:1. In the true spirit of homebrew simplicity, matching is not called for. but if you really want one. a small L-match or a gamma match will work.
Construction
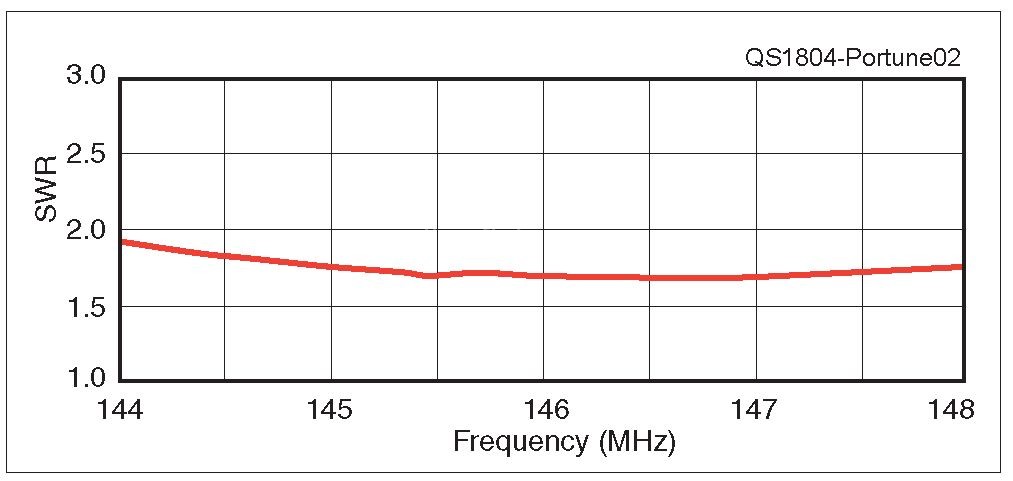
Figure 2 — The SWR of the coat hanger vertical is less than 2 across the 2-meter band.
Start by rummaging through your closet for two ordinary wire coat hangers — the cheap kind you get from the dry cleaners.
You’ll need hangers that are 16 inches wide; the 18-inch kind because they ca not be tuned to 2 meters. Neither the coat hanger’s finish nor its wire gauge are important. The hangers I used are 13-gauge (0.075 inches) and white powder coated. For indoor use, steel hangers and hardware are fine. For outdoors, weatherproofing and brass or stainless hardware are recommended.
Begin construction with the PVC mast (see Figure 3). I used 3⁄4-inch-diameter pipe, but 1⁄2 -inch diameter is also okay. First, mark and punch the center hole positions according to the diagram shown in Figure 3. Next, drill an 11⁄64 -inch hole through both sides at each position. Finally, enlarge the balun tie-wrap holes to 3⁄16 inches and the coax hole to 5⁄16 inches.
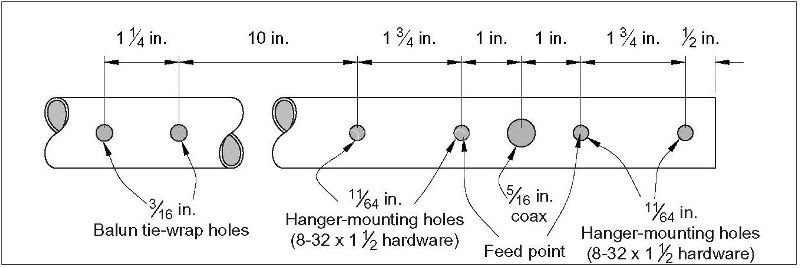
Figure 3 — Nominal positions of holes to be drilled on the PVC mast. The hanger-mounting holes may have to be shifted slightly to accommodate tuning.
Next, remove an inch of the coax jacket, unweave the braid, and twist the individual braid wires together.
Then, if you wish, add heat-shrink tubing for weatherproofing. However, do not put the ring terminals on yet — they won’t fit through the holes in the mast.
Straighten the hooked ends of the hangers and bend small terminal loops parallel to the hanger body planes to accept 8-32 screws (see Figure 4). Start with the wire uncut. After assembly, shorten the wires to set the operating frequency of the antenna. Be sure to scrape off the paint after forming the terminal loops.
Install the four 8-32 × 11⁄2 screws (see Figure 4). Pass the coax from the back through the 5/16-inch hole in the mast. Now add the ring terminals. Loop the coax down to the balun position and make five wraps around the pipe, securing them with a long tie-wrap through the 3/i6-inch holes. The coax should be kept at least an inch away from the lower hanger, with the wraps forming a choke current balun. Finally, attach the coat hangers between washer pairs, as shown in Figure 4.
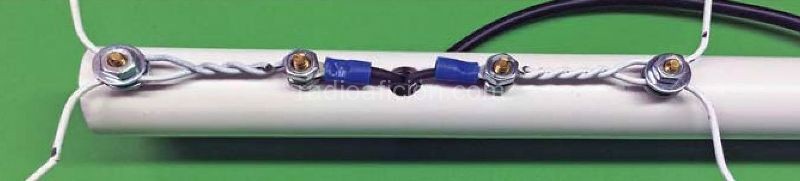
Figure 4 — Closeup of the feed point and hanger mounting.
Tuning
With the antenna completely assembled, begin reducing the lengths of the wire ends in short increments until the antenna resonates at the desired frequency. Cut off roughly an inch each time, and bend a new loop. My wires ended up roughly 2 inches long, but yours may vary. If you can’t reach the 2-meter band, your hangers are not the right size. The antenna can be fine-tuned by bending the horizontal portions of the hangers inward or outward. In the worst case, you might have to drill some new mounting holes, but this is easy with PVC as a mast material.
Getting It Out There
This build was a great way for our group of hams and me to demonstrate homebrew fitting our original criteria — it really works, it was inexpensive, and it was easy to build.
A horizontally polarized version of this antenna is also quite practicable. Just add a PVC T-fitting at the top to mount the hangers. A multi-element beam antenna is also possible with additional coat hangers, pipe, and fittings.
Simple do-it-yourself projects like this are great for getting started with homebrewing and motivating new hams. It is also ideal as a radio club group project — just provide attendees with partly pre-cut materials and let them try it out.
Photos by the author.
John Portune, W6NBC, is an ARRL member and frequent contributor to QST. He has been licensed for 52 years and has held an Amateur Extra-class license since 1972. John has a BS in physics and also holds FCC Commercial General Radiotelephone Operator and FCC Radiotelegraph licenses. He retired as a broadcast television engineer and technical instructor at KNBC in Burbank and then from Sony Electronics in San Jose, California.
Ultra Simple Coathanger 2m antenna
Download this article in pdf format
La entrada 2 meter vertical antenna built with coat hangers se publicó primero en HAM Radio.